|
|
|
|
|
Whew! Our web site keeps growing and growing. We've got music, literature, fashion, and film. We should create a Table of Contents and list all of the pages in our web site--but that's going to take forever. I don't think we'll have time to go surfing. |
|
|
|
|

|
|
Start polishing your surfboard, Pixel. Creating a Table of Contents is a snap because FrontPage does the bulk of the work for us. |
|
|
To create a Table of Contents:
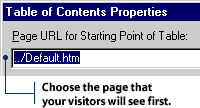
2. The Table of Contents Properties dialog box will appear. Choose the name of the page your visitors will see first. This name should appear by default - but if it doesn't, just click the Browse button and select the opening page from the list of file names.
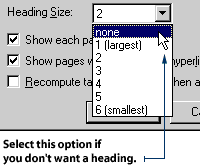
3. Select your Table of Contents heading size in the Heading Size drop-down box. If you do not want a heading, select None.
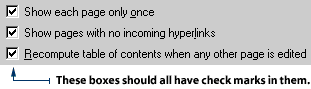
4. Click the Show Each Page Only Once check box. This will ensure your visitor sees only one listing of each page in the Table of Contents. 5. Click the Show Pages with no Incoming Hyperlinks check box. This option allows your visitors to go to pages on your site that do not connect to any hyperlinks. 6. Click the Recompute Table of Contents When Any Other Page Is Edited check box. This will ensure your Table of Contents is automatically updated when you add a new page to your web site.
|
|
|

|
|
|
|