|
|
|
|
|

|
|
Let's add some cell padding and spacing so our table has breathing room. |
|
|
To define cell padding and cell spacing:
2. Click Table on the Menu bar and select Table Properties. 3. To adjust the padding and spacing, adjust the spin controls for the Cell Padding and Cell Spacing boxes.

4. Click OK in the Table Properties dialog box. |
|
|
Hey, Blip. Our table is looking pretty good, but our columns and rows are all different widths and heights. If we don't fix them, we're going to lose marks for 'neatness'. |
|
|
|
|
|
|
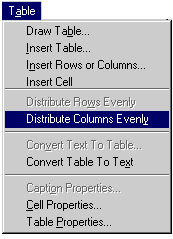
That's using your neuro-waves, Pixel! Lucky for us, FrontPage has a couple of commands that will help us tidy-up our columns and rows. |
|
|

2. Click Table on the Menu bar and select Table Properties. 3. Click on Distribute Columns Evenly or Distribute Rows Evenly.
To adjust cell height and width:
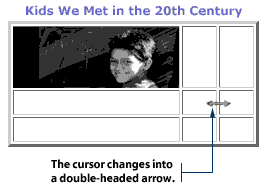
2. Hold down your left mouse button, then drag your mouse left or right, up or down, to adjust the cell size.
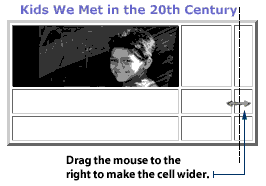
NOTE: You cannot make this adjustment to the left-edge and top-edge borders. |
|
|
|
|
We'd better align the pictures in the cells so they're nice and centered. Neatness marks can make or break a good project! |
|
|
You can align objects in cells - vertically, horizontally, or centered. There are two ways to do this: To horizontally align objects in a cell:
2. Click one of the alignment buttons on the Format toolbar to Align Left, Center, or Align Right the object.
To vertically align objects in a cell:
2. Click Table on the Menu bar and select Cell Properties.

3. Select an alignment option from the Vertical Alignment drop-down box.

4. Click OK in the Cell Properties dialog box.
NOTE: If you select Bottom, the object will align with the bottom of the cell. If you select Baseline, the object will align with the bottom of the cell's largest text. |
|
|
|