Vivid Videos


Oh yes, before I forget. My kid brother is a budding video director. He wanted me to ask you if you can handle video.


Your brother asked a good question. I sure can. I have a library of video clips to choose from. You can also grab video clips from the Internet or create your own clips using a video camera and video capture board. It's a great way to enhance a presentation.


Incredible. A mini-film festival! Move over, Hollywood.


Adding a video clip
If you want to add a video clip to your presentation, you can search for one in PowerPoint's Microsoft Clip Gallery. You can choose from many clip art video files.

To add one of these video clips to your presentation, follow these steps:

    1. Click on the Insert tab. Go to the Sound button in the Media Clips Group. Click on the arrow beneath the word Movie. From the drop-down list, select Movie from Clip Organizer.

Selecting Movie from Clip Organizer

    2. In the Clip Art task pane, type a search term for the type of video you want to add. In the "Search In" option, pick All Collections from the drop-down list, and from the drop-down list in "Results should be" select Movies. Click Go to get the search results. Clip Art with animations built-in have a yellow star icon in the bottom right corner.

Choosing a video

    3. Decide which video clip you want. If you click within the video clip icon, it will be automatically added to the current slide showing. To see what the clip is like before adding it, move the mouse over the icon. An arrow appears on the right of the icon. Click on the arrow and a drop-down menu appears. Select Preview/Properties. The Preview/Properties dialog box will appear. The video clip will play and you can see the details about it. Click on Close when you are done.

Select Preview/Properties

Preview/properties dialog box

You can also add video clips from other sources such as CDs or the Internet. Let's say you've found a cool video clip on the Internet that you want to add to your presentation. Here's what you do:

    1. Click on the Insert tab. Go to the Movie button in the Media Clips Group. Click on the arrow beneath the word Movie. From the drop-down list, select Movie from File. The Insert Movie dialog box will appear.

Selecting Movie from File

    2. In the Look in box, locate the drive and folder where you have saved the video clip.

    3. Select the video clip file from the file list, then click OK. A video screen icon is added to the slide. You are also asked how you want the video clip to play, automatically or when clicked on.

    Choose when you want video clip to play

      4. A video clip icon is added to the slide and is already selected (in edit mode). You can resize the icon or move it to other areas of the slide. As well as the icon, in the Ribbon, the Movie Tools tab automatically appears.


That's fantastic! But wait, what if I made a mistake? I can change when the video clip will play, like we did with the audio clip, right?


Jim, I think you're catching on.


I can't take all the credit. You're very user-friendly.


My mom taught me to have good manners. While we're doing that, we might as well add an animation effect, so it can make a grand entrance...


Changing when a video clip plays
The following steps show you how to change when a video clip plays, and add an animation effect to the video clip icon.

    1. In Slide View, click the video screen icon to select it. The Movie Tools tab appears. Click on the Movie Tools tab to make it active in the Ribbon.

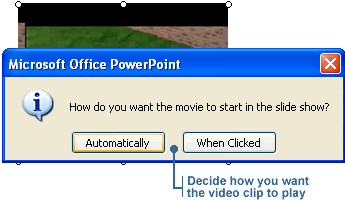
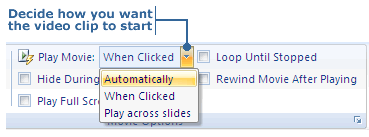
    2. In the Movie Options Group, go to the Play Movie command. From the drop-down list, select how you want the video clip to start.

Movie Tools tab

    3. To add an effect to the video clip, first select the icon in the slide. Then click the Animations tab and click Custom Animation. The Custom Animation task pane will appear. The video icon is automatically listed in the pane along with any other effects on the same slide.


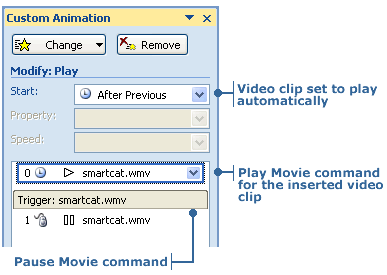
    Note: When the video clip is set to play automatically, there are 2 items listed for the video clip in the Custom Animation task pane. The first is the control to play the movie. The second is a control to pause the movie while it is playing.

Video clip in Custom Animation task pane

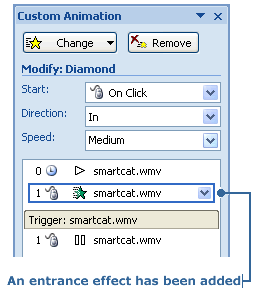
    4. Click the Add Effect button. Pick an animation effect from the drop-down list that appears. For example, Diamond. Click OK to apply the effect.

Animation effect added to video clip

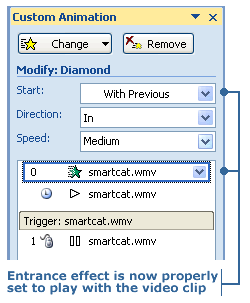
    5. When an effect is applied it has default settings for speed and direction, and it's set to start on a mouse click. Use the Modify section in the Custom Animation task pane, or click on the arrow beside the effect and choose Effect Options, to change the animation effect's features.


    Note: If you choose an entrance effect, it must be listed as the first item in the Custom Animation task pane, or else it will not play. Use the Re-Order buttons to make it first. Also, to make the entrance animation effect play automatically with the video, you must pick the With Previous option.

Changing how an effect looks

    6. In the Custom Animation task pane, click Play to see how the animation effect and video clip will look. Or, you can click the Slide Show button to run it.

    Alternatively, you can click Preview in the Animation tab. If you click Preview in the Movie Tools tab, it ONLY plays the video clip.


Note: You can also change how a video clip starts by using the Start function listed in the Modify section of the Custom Animation task pane. When video has been set to play automatically with the command in the Ribbon, it shows as After Previous.


Back
Quick Quiz