Riveting Ribbon


Nice to see you, PowerPoint. Or can I just call you Power? You're looking great by the way, I bet you've been working out.


I can't help but notice that fancy Ribbon of yours. It looks positively loaded with features.
Did you score a new contract or your own reality TV series? Can you folks back home see this? With a Ribbon like that, you can put together some really sensational presentations.


Welcome to the Ribbon

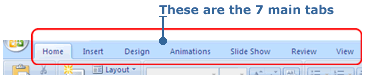
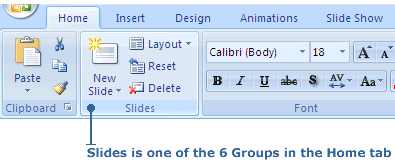
The Ribbon is the completely new user interface in PowerPoint 2007, designed to make it easier and faster to create fantastic presentations. The Ribbon together with the Microsoft Office Button and Quick Access Toolbar will give you access to everything you'll need to do for a presentation.

The Ribbon is located near the top of the PowerPoint window, covering an area from left to right. The Ribbon is composed of tabs, each of which performs a key task.

The Ribbon

Click on the image to see the Ribbon in detail.


The main tabs are Home, Insert, Design, Animations, Slide Show, Review and View. When we cover the main tabs in more detail, you'll learn about the other tabs - Contextual tools and Program tabs - that only appear when you need them while performing certain tasks.

The main tabs


When you open PowerPoint, the tab always displayed to start out with is the Home tab. You start at the Home tab because it has all the common tasks you'll want to use in making your presentation.


Note: Moving from one main tab to another is simple, just click on the name of the main tab you want to go to. Everything associated with the tab you pick will appear, while the previous one becomes hidden.


The main tabs are organized into specific Groups containing graphically illustrated buttons. Each Group breaks a key task into subtasks. For example, the Home tab has 6 Groups: Clipboard, Slides, Font, Paragraph, Drawing, and Editing.

A Group in the Home tab

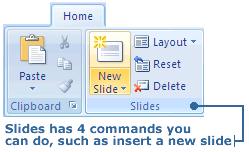
Within each subtask are more controls - either buttons, galleries or dialog boxes - that allow you to carry out a command. For example, there are 4 commands to choose from in Slides: New Slide, Layout, Reset and Delete.

Commands in the Slides Group


You'll notice that each command becomes highlighted as you move the mouse around in any group, such as Slides. When you have picked which command you want to do, click on it. The command will either execute, or you will be presented with options to select from first before the command is carried out.


Besides the Ribbon, one of the other two main features is the Microsoft Office Button. It is located in the top left area of the PowerPoint Window. You'll want to click on it when you want do tasks like print, save, open, publish, close and create a new presentation. Most importantly, it's where you go to shut down PowerPoint when you're done for the day.


Note: Click on the Microsoft Office Button ONCE to access it. If you double-click the Microsoft Office Button, PowerPoint will shut down if there have been no changes made to a presentation. If you have made changes, you will be asked if you want to save them. Pick Cancel or click the red X button to keep PowerPoint from shutting down.

Microsoft Office Button


The Microsoft Office Button also gives you to access to the PowerPoint options which control the features of the PowerPoint application itself. The options are organized into categories that include Popular, Proofing, Typography, Advanced and Customize. For example, you can change PowerPoint's default blue layout color to silver or black. The PowerPoint options are something to try when you become comfortable using the program. You will not need them to create your presentation.

PowerPoint Options Dialog Box


The last feature you need to know about before starting to create a presentation is the Quick Access Toolbar. It is located at the top of the PowerPoint window, to the right of the Microsoft Office Button. As its name implies, this is where you want to go to quickly access tools you will use frequently. The Quick Access Toolbar by default has buttons for the common tasks of Save, Undo and Redo.

Quick Access Toolbar


You can add other tools to this bar such as Open, New and Spelling. You can even choose what order the icons appear in the Quick Access Toolbar. To see what other tools you might want to add, click on the arrow on the right. A drop-down list will appear. Click on the tool you want to add, for example, Print Preview. The Print Preview icon will now be added to the Quick Access Toolbar. Repeat this process to add other tools.

Add Buttons to the Quick Access Toolbar


Keyboard shortcut tip


Wow, that's a lot to digest. It's like being a kid in a candy store. Where do you begin?


No worries. You won't get lost. We'll just go one step at a time. I promise, it's easy - and fun.


More fun than a candy store?


Now Jim, how are you going to learn anything if you're thinking about food?


Getting familiar with the main tabs

The 7 main tabs in the Ribbon give you everything you need to make your presentation. As always, you'll start out with the Home tab, your base of operations if you like. Now it's time to see what the other main tabs can offer.

The name of each main tab implies what kind of tasks you'll find within it.

The Insert tab is where you go to add in objects to a slide as well as edit any objects you add. Objects include tables, images, clip art, shapes, WordArt, video clips, and audio clips. You can even import items from other programs like Microsoft Excel.

The Design tab is where you go to control how your entire presentation will look: it's theme, colors, fonts, style and even add in theme effects.

The Animations tab is where you go to add animation to any object as well as add transition effects to the slides.

The Slide Show tab is where you go when you want to test how your presentation will run. From this tab you can alter the timing of the slides, record narration, specify what slides get used in a show, and pick what mode it will run in.

The Review tab is where you go when your presentation is about finished, but you may want to do some final checks like spelling or use the thesaurus to replace some words. You can also add in comments to slides to provide some additional documentation.

The View tab is where you go when you want to switch between PowerPoint's views: Normal, Slide Sorter and Slide Show. From the View tab you can also change the formatting of a slide's master layout, re-arrange your slides, or use tools such as zoom and gridlines to help get your slide content exactly how you want it. If you have several presentations open, you use the View tab to organize and move about the different Windows.

As you can see, there are lots of Groups and Command buttons in each main tab, but you don't have to try and learn them now. We'll be covering in more detail all the crucial ones as we go along to help you make your presentation.


My producer is telling me we need to cut to a commercial break. Is there anything else you want to mention about tabs?


Well, I have other tabs and buttons that do some amazing things... but you can't see them in the Ribbon... not until you need them that is...


Gee, you have a button for everything. You're like James Bond with all these gadgets. Do you have a button for making
grande lattes?


I think that's planned for PowerPoint 20
10. Ha ha ha... But seriously, I do need to be a little bit like James Bond when it comes to handling my mission of making good presentations.


Accessing more features

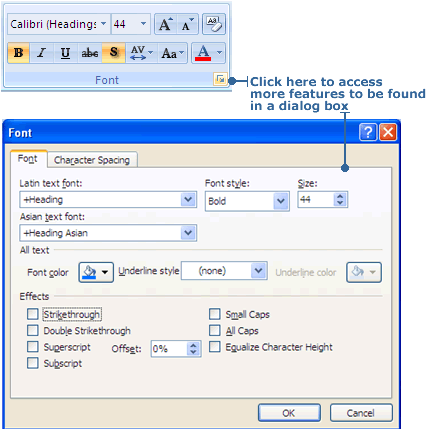
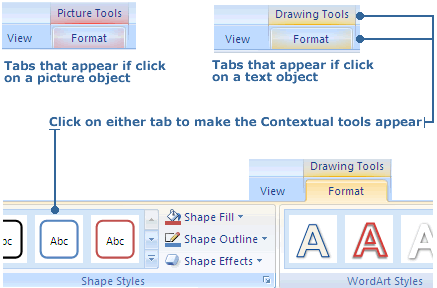
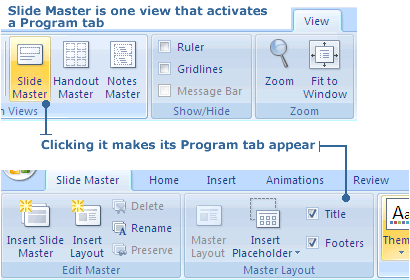
It would be very hard to show all the options a task can do in the Ribbon. That's why many of the options are hidden until you need them. All that is usually needed to make them appear is a mouse click. Sometimes you don't have to do anything at all, they will become available automatically when certain tasks are chosen.


To the right of many Command buttons, you will find an arrow. When you click on it, a drop-down list will appear, showing all the options possible for that Command. Decide which option you want and then click on it.

Arrow reveals a drop-down list


Other Command buttons have a little box with a downwards pointing arrow inside it. When you click on it, a dialog box will open up, revealing the options you can choose from. The dialog box itself might have different tabs within it to better organize all the options.

Revealing the dialog box


A few Command buttons when clicked on will make a task pane appear. By default, the task pane will appear as a side bar to on the right side of the PowerPoint window. You can resize or move the task pane to where you like. To close the task pane, just click on the the X button in the top right corner.

The task pane you'll use the most is the one to apply custom animation effects to objects and slides. You'll learn about the functions in the Custom Animation task pane later on.

Task pane


Some features have too many options to be handled in a drop-down list or dialog box. When one of these features is activated, a Contextual tool or Program tab will open up as well.


Contextual tools are activated when working with objects such as tables, text boxes or pictures. When you click on an object, the Format tab appears to the right of the View tab. Above this is an another tab showing what tools you can access for the type of object you are working with. It will say Picture Tools if the object is a picture, Drawing Tools if it's a text box, and so on. Click on either Format or the tab above it to reveal its tools. Like other tabs, the Contextual ones contain Groups and Command buttons. Simply click outside of an object to hide the Contextual tools. The Home tab will appear.

Contextual tool


When you switch to certain modes or views, such as Slide Master, the main tabs in the Ribbon will be replaced with a different set, known as a Program tab. A Program tab contains all the commands and tools associated with a given view or mode. To close a Program tab, click on the red X button that is the last Group on the right. The Home tab will appear.

Program tab


Back
Quick Quiz
Next