|
|
|
|
|

|
|
I want to know if our visitors are "Male" or "Female". So let's add some radio buttons. |
|
|
What about "independent droids"? |
|
|
|
|
They haven't been invented yet. But to make you happy, I'll add a radio button for "Other". |
|
|
To add a radio button:
2. Press the Enter key on your keyboard, then click Radio Button on the Forms Toolbar. 3. Position your cursor between the radio button and the Submit button, then press the Enter key on your keyboard.
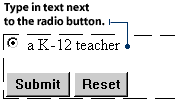
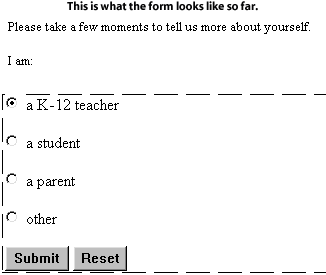
4. Position your cursor to the right of the radio button. Type a K-12 teacher, then press the Enter key on your keyboard.
5. Click Radio Button button on the Forms Toolbar again. Type a student, then press the Enter key on your keyboard. 6. Add two more radio buttons as you did above, with the following text labels: a parent and other.
8. In the Group Name box, type the word who. A "group" refers to a group of answer choices that are associated with a question.
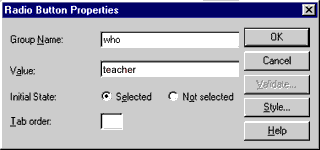
10. Click OK on the Radio Button Properties dialog box. 11. Repeat steps (7) through (10) for each radio button. Be sure to type the same name (who) into each Group Name box, but a different value name into each Value box (teacher, student, parent, other). Choose Not Selected as the Initial State for all of the radio buttons. This means none of the radio buttons will be selected when your visitor first sees the form.

|
|
|
Hey, let's ask kids about their favorite hobbies. You know, like time-skipping, fractal-jumping, virtual reality sculpting... |
|
|
|
|
|
|
None of those have been invented yet, Pixel! Try hobbies like drawing, swimming, shopping, and so on. |
|
|
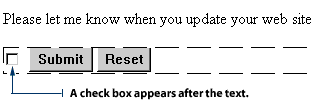
Unlike radio buttons, you do not have to use check boxes in groups. You can use a single check box and ask a question like: "Do you want to receive e-mail updates?" You would use a group of check boxes when you want your visitors to select one or more options from a long list - like when you ask: "Which of the following answer choices apply to you?" To add a check box to your form:
2. Click the Check Box button on the Forms Toolbar. The check box will appear at the end of your sentence.
4. You will see the Check Box Properties dialog box. Type the word update in the Name box. It's best to use a name you will remember.
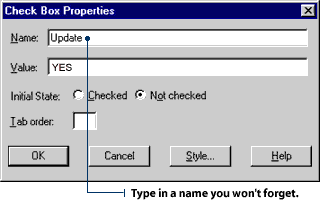
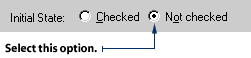
6. Select Not Checked where you see the Initial State radio buttons. This means the check box will not show a check mark when your web site visitor first sees it.
7. Click OK on the Check Box Properties dialog box. |
|
|
|
|
This check list of hobbies is taking up a lot of space. I want to make sure we leave some room for other questions. |
|
|
No problem, Blip. We can use a drop-down menu. It allows people to check multiple answers, but takes up less real estate on the computer screen. |
|
|
|
|
To add a drop-down menu to your form:
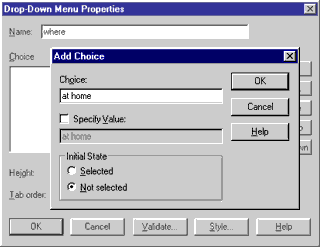
2. Click the Drop-Down Menu button on the Forms Toolbar. 3. Double-click the drop-down menu field that appears. You will see the Drop-Down Menu Properties dialog box.
4. Type the word where into the Name box. 5. Click the Add Choice button and type at home into the Add Choice dialog box. 6. Click Selected, then click OK in the Add Choice dialog box.
8. Click the Allow multiple selections radio button so it is selected. This allows your visitor to choose more than one answer choice.

To select more than one option, hold the CTRL key on your keyboard while clicking your options.
|
|
|
|