
|
|
|
IE4 knows that you're going to be visiting Web sites created by all sorts of people and organizations. Some of these people you will trust to make programs without viruses and to protect the information you send to them. IE4 lets you group these trusted sites into a safe zone where you can mix n' mingle without worrying about things that can harm your computer.
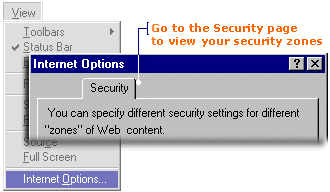
IE4 will also group sites that you don't trust. When you visit these places, IE4 will be on the lookout and warn you before you download programs that may be potentially hazardous. That's my buddy! To see the four security zones:
With four different security zones, you're sure to find the right one to place sites you trust and ones you don't. |
| Security Zones in IE4
|
||
| Zone | Purpose | Sites to place in this zone |
| Local Intranet | For sites on your organization's intranet (may, or may not, apply to you) | Sites created by people that are part of a special closed-Internet system. E.g.: local area schools, the school board |
| Internet | For general Web browsing | All sites on the Web are automatically in this zone. You can increase or decrease the security level for any site in this zone by adding it to the Trusted or Restricted zones. |
| Trusted Sites | For Internet sites you trust | Sites on the Web that have been created by reputable people or organizations. E.g. DEN, Microsoft, Disney |
| Restricted Sites | For Internet sites you don't trust | Sites that may have caused virus problems in the past or misused data. |
|
IE4 is unbiased when it comes to security. It will treat all Web sites with the same level of suspicion by grouping them into the Internet security zone.
If you want IE4 to treat certain sites with more suspicion, then single them out and place them in the Restricted sites zone. If there are sites you trust, then add them to the Trusted sites zone. When IE4 visits these specific Web sites, it will know whether to relax, or be on the lookout for them varmits! To open a zone window:
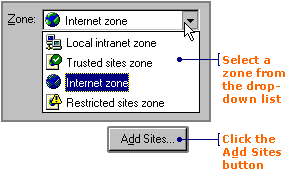
Note: The Add Sites button will not appear if you select Internet Zone because ALL Web sites are already included in this zone.
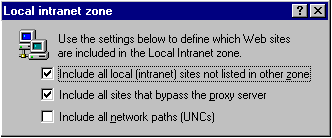
If you are adding to your Local intranet zone, then you will see the following window. If you are in doubt about which of these boxes to check or leave unchecked, then contact your network administrator for advice.
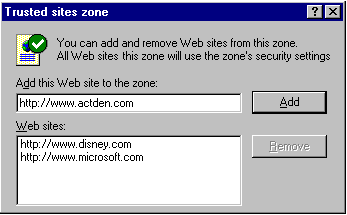
If you are adding to the Trusted sites zone, or the Restricted sites zone, you will see a different window. This window has an area where you can enter the URL for a site.
To add a site to a zone:
To remove a site from a zone:
|