PowerPoint in the Classroom

with Jim Jingle UNIT 3
Making Changes

  • Tame Text
  • Whizzy Words
  • Picky Points
  • Bold Backgrounds
  • Shipshape Spelling
  • Cool for School


PowerPoint in the Classroom is produced by ACT360 Media Ltd.
Copyright 2007. All rights reserved.

See our entire collection of online tutorials
by visiting www.ACTDEN.com


Tame Text


Help us out here, Power. Let's say you've got a text box about worms centered in your slide. Maybe you decide you want to move it to the left... Can you do that?


Hey, they don't call me Power for nothing. But if you want to make the following changes to text boxes, make sure you're in Slide View.


Moving a text box
If you don't like where a text box is positioned on a page, you can move it to a new location. First you select it, then you move it.

    1. Click the text box you want to move. A thick gray border will appear around the text box.

    2. Place the pointer on the border. The pointer will change into a four-headed arrow.

 Move Pointer

    3. Hold down the mouse button and drag the box to the new location.

    4. Release the mouse button.


Power, let's say I have a text box listing my great qualities. How can I increase the size of that text box to fit everything?


You'll also need to resize the text box that holds your ego, Jim.


Ho ho! The chemistry. No wonder you two get such high ratings.


Resizing a text box
The gray border that appears around an object when you select it has square handles on its corners and on its sides. These are called selection or resizing handles. You can click and drag these handles to resize text boxes.

    1. Click the text box to select it. A gray border will appear around the text box.

    2. Place the pointer on a resizing handle. The pointer will change into a two-headed arrow.

 Two headed arrow

    3. Hold down the mouse button and drag the resizing handle until the box is the size you want. Drag outwards to make the box larger. Drag inwards to make the box smaller.


Resizing a text box tip


Now let's say I have a text box about this guy I like. Then I meet another guy I like. How do I add a text box to talk about him?


Fickle, fickle. Here, let me show you how...


Adding a new text box
Sometimes, you may want to add text to a slide without using a built-in text box. For example, you may want to type a label for a drawing, or you may want to add text to a blank slide layout. In PowerPoint, you can add your own text boxes to any slide using the Text Box tool on the drawing toolbar.

    1. On the drawing toolbar, click the Text Box button. The pointer will change to a cross.

Text box button

    2. Click on the slide where you want to place the text. A small text box will appear.

    3. Type a word in the text box. As you type, the box will expand to fit the text.

Expanding text box
Expanding text box

    4. After you finish typing, click outside the text box. The border around the box will disappear.


How about copying text boxes? Do I have to type the whole thing over again?


Jim, come on, I'm a computer program. Why do you think we were invented?!! To prevent you humans from having to do repetitive tasks.


Oh, I like that...


Copying a text box

    1. Click the text box to select it.

    2. Place the pointer on the box's border and click again. The insertion point will disappear from the text box.

    3. Click the Edit menu, then click Copy.

Copy command

    4. Click the Edit menu again, then click Paste. A copy of the text box is now pasted on top of the original box.

Two text boxes

    5. Click and drag the new text box to the location you want.


Keyboard Shortcuts tip


How about deleting? Can you delete a text box you don't need anymore?


Piece of cake.


I wish deleting dirty dishes were this easy!


Deleting a text box
You can delete your text boxes using the Delete key on your keyboard.

    1. Click the text box to select it. A gray border will appear around the text box.

    2. Click the box's border. The insertion point will disappear from the text box.

    3. Press the Delete key on your keyboard. The text and the border both disappear. The entire text box is deleted.

If you want to delete a built-in text box (one that came with the original slide), you need one additional step.

    1. Click the text box to select it.

    2. Click the box's border and then click the Delete key. The text disappears, but the border remains.

    3. Click the border again and press the Delete key. The entire text box is deleted.

Deleting the text box border


Whizzy Words


What do you do if your text boxes look drab? If someone's doing a presentation on something important like preserving the rainforest, they want it to catch the eye.


I would suggest color... You can make your text box any color on a Toucan's beak, and then some.


Adding color to a text box

    1. Click the text box to select it.

    2. On the drawing toolbar, click the arrow beside the Fill Color button, then click the green color box. The text box will turn green.

Choosing a color


Green text box


What if you want to further offset your text box? Can you give it an outline?


You sure can. And you don't even need a ruler...


Outlining a text box
As you have seen, the thick gray border that appears around a text box is temporary and disappears when the text is deselected. If you want a permanent outline around your text box, create one using the drawing toolbar.

Try adding a blue dotted outline to a text box.

    1. Click the text box to select it. A border will appear around the text box.

    2. On the drawing toolbar, click the arrow beside the Line Color button, then click the blue color box.

Line color

    3. Next, click the Line Style button, and then click 3 pt.

Line style

    4. Finally, click the Dash Style button, and then click the square dot dash option. A dash style box will appear.

Dash button

    5. Click outside the text box to deselect it.

How the outline should look


Picky Points


Quick question. Let's say your text box is about King Arthur and the Knights of the Round Table. Is there anything you can do to make it look more medieval?


For starters, you could change the font to something gothic, you know, to make it look King Arthur. I'll show you how to do that next. Any chance you can get me tickets to Sir Spamalot on Broadway?


Changing your font

    1. Click the text box to select it.

    2. Place the pointer on the box's border, and click again. The insertion point disappears, indicating that the entire text box is selected.

    3. Click the Format menu, then click Font. The Font dialog box appears.

Formatting font

    4. In the Font style list, click Bold; in the Size list, click 36; and in the Color list, click green.

Font options

    5. Click OK to close the font dialog box.

All the text in your text box is now green, bolded, and a font size of 36.

Green


Now my teleprompter is telling me to ask about changing the bullet style. Does this mean I'm going to have to put on a tie?!!


Relax, Jim. A bullet is a symbol or small graphic you can use to offset a list of text. I'm sure your viewers have seen them before. It's very easy to change bullets to suit your style.


Selecting a new bullet style

    1. Click anywhere in the bulleted text to select it.

    2. Click the Format menu, then click Bullets and Numbering. The Bullets and Numbering dialog box will appear.

Choosing a bullet

    3. Click one of the bullet styles shown.

Choosing a bullet

    4. If you want, select a new color for the bullet in the Color list box.

    5. Click OK. The new bullet style will appear in your bulleted text.

square bullets


Bold Backgrounds


I liked being able to change the text box color. Can I do the same thing with the background? That will really jazz things up!


Changing your background color
In PowerPoint it's easy to change the background color of the slide you are working on. Let's say you want to change the color of the slide to light blue. Here's what to do:

    1. Click the Format menu, then click Background. The Background dialog box will appear.

Selecting Background

    2. In the Background fill section, click the arrow on the list box to open it.

    3. Click More colors to open the Colors dialog box.

    4. In the Colors section, click a light shade of blue.

Colors dialog

    5. Click OK to close the Colors dialog box.

    6. In the Background dialog box, click the Preview button to see a preview of the slide color.

Color preview

    7. If you like what you see, click the Apply button. The background color of the slide is now light blue.


Okay, now my teleprompter is telling me to ask about background patterns. What do you have to say about that?


Well, it's an easy way to add some texture to a presentation. Polka Dots. Plaids. Stripes...


It sounds like Jim's golfing outfit.


Ouch...


Changing your background pattern

    1. Click the Format menu, then click Background. The Background dialog box appears.

    2. Click the Background Fill list box, then click Fill Effects. The Fill Effects dialog box will appear.

Fill Effects

    3. Click the Pattern tab, and then click the pattern you want in the Pattern box. A preview of the pattern will appear in the Sample box.

Preview the pattern

    4. If you want to change the background and foreground colors of the pattern, select them from the Background and Foreground drop down lists.

    5. Click OK to close the Fill Effects dialog box.

    6. In the Background dialog box, click the Apply button.


Shipshape Spelling


Another question. I'm a terrible speller. What happens if I'm giving a school presentation on Michael Jackson, and I say he's basically a pretty "norml" guy? People are going to think I'm the strange one.


That's why I offer a spell checker. It will flag those words and offer a correct spelling.


Checking your spelling
It's a good idea to check the spelling in your presentation before the audience sees it. Let PowerPoint's spelling checker check the presentation for you. When you activate the spelling checker, it checks the spelling in all of your slides.

    1. On the Standard toolbar, click the Spelling button.

Spell Checking button

    2. If a spelling error is detected a Spelling dialog box appears.

    3. The Spelling Checker suggests an alternative spelling in the Change To box. An additional list of suggestions may also appear below the box.

Alternative spellings

    4. If you want to continue without changing the spelling, click Ignore.

    5. If you want to change the spelling, enter one of the suggested alternatives in the Change To box, then click Change.

After you've made your selection in the spelling dialog box, the spelling checker will continue checking the remaining slides. When it has checked all the slides in your presentation, a message box will appear telling you that the spell check is complete.


But what if for some reason you wanted to purposely misspell a word? What if my pet turtle's name was "Norml"?


PowerPoint is all about choices. You can refuse to change the spelling or even turn the spelling checker off.


Turning the automatic spell checker
off
PowerPoint 2003 also has an automatic spelling checker. As you type, a red wavy line appears under misspelled words. If you want to correct the spelling immediately, you right-click your mouse on the word, and a menu appears suggesting spelling alternatives.

If you don't want to see wavy red lines under misspelled words as you type, you can turn the automatic spelling checker off.

    1. Click the Tools menu, then click Options. The Options dialog box appears.

Select options

    2. Click the Spelling and Style tab.

    3. Under Check spelling as you type, click the check box to deselect it. The check mark disappears.

Deselecting the spell check option

    4. Click OK to close the Options dialog box. The automatic spelling checker is now deactivated.

Note: The automatic spelling checker is turned off, but the main spelling checker still works. You can check the spelling in your presentation at any time by clicking the Spelling button on the Standard toolbar.


Cool For School

PowerPoint Pretty

Frugal Fonts
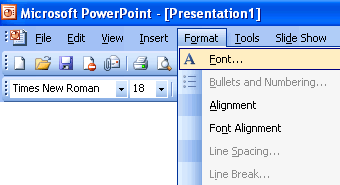
It's lots of fun to try out different fonts. Sometimes it can even be a bit too fun. Considering there are thousands of fonts out there, you can end up making some pretty wacky choices for your presentations - and if you are tempted to do this, imagine how your students are going to feel. Making an entire presentation in Funky Chicken Scratch may be fun for the creator, but it could end up being difficult - if not impossible - for your audience to comprehend. For this reason, it's important to choose your fonts very carefully.

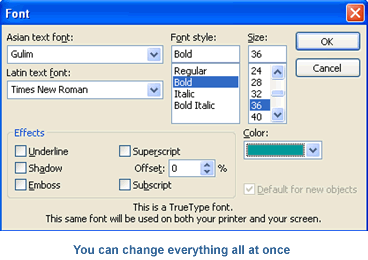
If a presentation contains a lot of text, it's good to use a font such as Times New Roman, which is known as a "serif" font. A "serif" is a small, decorative mark that finishes off the stroke of a letter. There are also other fonts called "sans-serif" - which means: without serif. "Sans" - as you may recall from French class - means "without." In general, it is easier to read a large amount of text when a serif font is used. Sans-serif fonts also tend to create a more casual, less-formal impression.

 serif and sans serif fonts

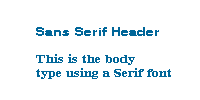
Designers often recommend using font styles that contrast with headers from the rest of the text. A common practice is to use a san-serif font for the header and a serif font for the body - for example:

Helvetica for the header and Courier for the body.

 serif and sans serif fonts

If you want to use different fonts within the same presentation, it's best to keep it down to only two or three. Using a smaller number of fonts will keep things orderly; too many different types may make it all a bit too chaotic. Like so many things in life, you'll just have to experiment before you know what works best.

When you are trying to decide which fonts to use, consider how they will look on screen. Some fonts - like Verdana - tend to look better on a computer monitor. Other fonts are more suited to print. Think about which method of presentation you will use and test your font in that medium to see if it is legible. Is it visible on a computer screen or digital projector? Does the font still look good when your presentation is printed out?
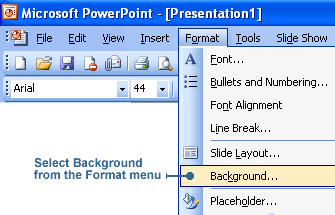
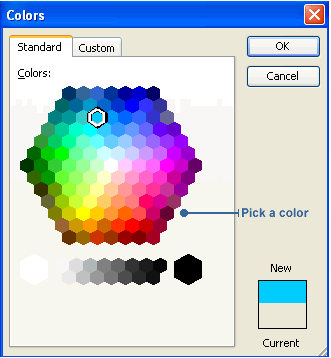
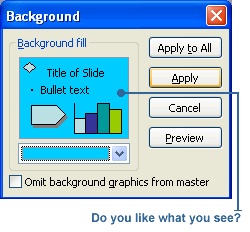
Tasteful Tiles
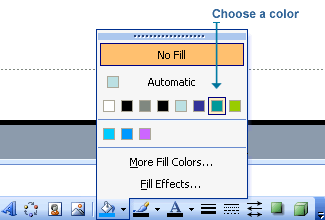
When it comes to text colors and background colors and patterns, you are once again given a dizzying array of choices. While it is possible to go crazy with them, it's best to stay on the more conservative side and create something your audience can actually read.

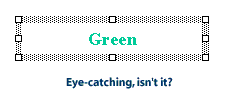
It's good to choose a high contrast between text and background colors. For example, black text on a white background is most legible. Other good combos include white text on a dark blue or purple background - or dark blue text on a yellow background.

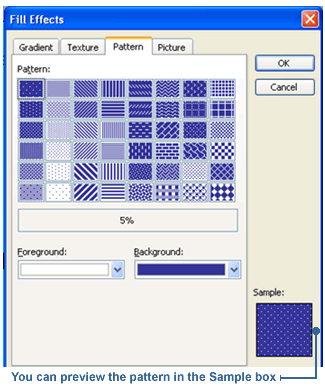
If you want to use backgrounds, avoid patterned ones. It's best to keep the background pattern as subtle as possible. Some patterns make it very difficult to read text - and we doubt you want to make your audience dizzy or nauseous.

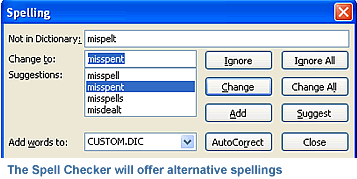
To spell check or not to spell check
That is the question... Each way of going about it has its own advantages. Using the spell checker is a good way to maximize the use of time - that most precious of resources. It's pretty nice to just sit back as the computer scans the document. The downside is that you may have used a wrong word - spelled correctly - and the computer cannot point out such errors for you.

The advantage to not using spell check is that it forces your students to be more careful about their spelling. The spell checker can often be a crutch that allows people to develop poor spelling habits, and that's just no good. Ultimately, however, the choice is up to you!