Dashing Disk


This brings us to another very important question. If Billy has a presentation in history class, does he have to lug his family computer to school? What if Mom needs it the same day for a presentation of her own?


That's when packing a presentation comes in.


Is the presentation going on a trip?


You've got it. Packing means putting the whole presentation on a disk, which allows you to do your presentation on any other computer (with the right configuration). A school computer, for example. Here are the steps...


Packing your presentation
You can easily pack your presentation on a floppy disk using PowerPoint's Pack and Go Wizard. The Wizard packs your presentation, as well as software necessary to run the program. You then copy the presentation to the computer you will be using to run your presentation.

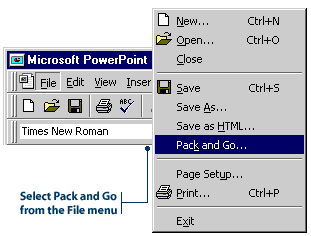
If the destination computer doesn't have PowerPoint 97 installed, include the PowerPoint Viewer when you pack the presentation. Just make sure the destination computer has the necessary system requirements. The PowerPoint Viewer works for Windows 95 and Windows NT, but it doesn't work for Windows 3.1.

Follow these steps to pack your presentation:

    1. Insert a disk into your floppy A:\ drive. Have other disks handy in case your presentation doesn't fit on a single disk.

    2. Open the presentation you want to pack.

    3. Click the File menu, then click Pack and Go. The Pack and Go Wizard dialog box appears.

Selecting Pack and Go fromthe File menu

    4. Follow the instruction in the Pack and Go Wizard.

    (a) When asked which presentation you want to pack, select Active Presentation.

Active Presentation window

    (b) When asked where you want to save the presentation, select A: drive (your floppy disk drive).

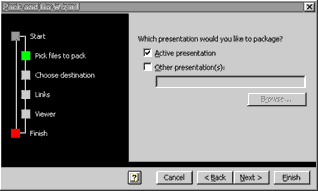
    (c) Select Include linked files to include linked files and fonts.

    (d) Select Viewer for Window 95 or NT if the destination computer doesn't have PowerPoint 97 installed.

    5. When you finish selecting options, click Finish.

The Pack and Go Wizard compresses your presentation to your floppy drive. If the presentation is too big to fit on one disk, it will prompt you to insert disks as required.


Saving Your Presentation tip


Okay, packing a presentation sounds pretty easy. But how do you put it on a different computer?


Easy as pie. I can walk you through the steps.


There you go bringing up pie again. We really need to get something to eat after the show...


Unpacking your presentation
Follow these steps to unpack your presentation from your disk.

    1. Place your disk in the floppy drive of the destination computer.

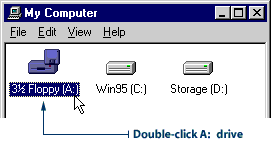
    2. On the Windows Desktop, double-click the A: drive icon to display the contents of the disk.

Selecting your A: drive

    3. Double-click Pgnsetup.exe. The Pack and Go Setup dialog box will appear.

    4. Select a folder on the computer's hard-drive, then click OK. When the presentation is installed, a message box appears confirming the installation. It also asks you if you want to run the slide show now.

    5. Click Yes to run the show immediately.

If you don't want to run the Slide Show immediately, follow these steps later, when you do want to run your presentation.

    1. Open the folder where you copied the presentation.

    2. If you didn't include the PowerPoint Viewer, double-click the presentation to open it.

    3. If you included the PowerPoint Viewer, double-click PpView. The Microsoft PowerPoint Viewer dialog box will appear.

PowerPoint Viewer Icon

    4. Click the presentation you want to show, and then click Show.


Back
Quick Quiz
Next