Swift Saves


What's the biggest disaster you've ever had working on a presentation?


I was in Italy, where I had finished preparing a presentation on different types of pasta. It was three months' work.


The Italians have a lot of different types of pasta.


Uh...ya, Jim. Lots of pasta. Anyway, I had just put in the finishing touches when "Bam!". The power went out.


Oh, that must have been terrible. You lost all that work!


Fortunately, I had been saving my work, so I managed to recover it all. My recommendation to all your viewers is: Save your work! That night I could have been scrambling to redo my presentation. Instead, I was riding a gondola in Venice.


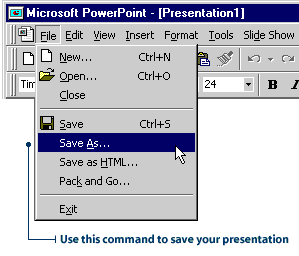
Saving Your Presentation
While working on a presentation, it's a good idea to save your work often. Otherwise, you risk losing your work. The next steps show you how to save your presentation to your hard drive for the first time, using the Save As command.

    1. Click the File menu, and then click Save As. The Save As dialog box will appear.

Saving your presentation

    2. In the File name box, type a name for your presentation.

Naming your saved file

    3. Click Save.
The presentation is now saved to your hard drive.

Once you've saved the presentation for the first time, periodically save it by clicking the File menu, then clicking Save. Or, click the Save button on the Standard toolbar.

Save button


Back
Quick Quiz
Next