in conjunction with Microsoft Corporation.
Copyright 1999. All rights reserved.
|
|
-
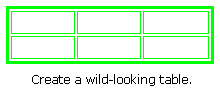
Tables are handy when you need to display information in columns and rows.
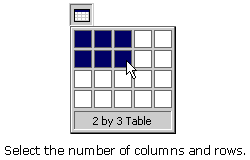
To create a table:
1) Place the cursor on the page.
2) Click the Insert Table button on the Standard toolbar. A drop-down grid appears.
3) Move the pointer to select the number of columns and rows you want, then click once to accept the setting. The new table appears on the page.
-
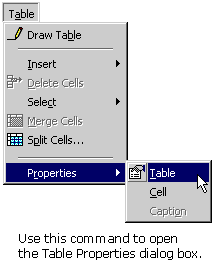
To adjust the width, color, and alignment of your table's borders:
1) Place the cursor in the table.
2) Click Table on the Menu bar and select Properties, then Table. The Table Properties dialog box appears.
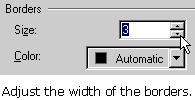
3) Adjust border width by clicking the spin controls on the Borders Size box. Note: To make the Borders invisible, set the spin control to zero.
4) Adjust border color by clicking Borders Color and choosing your color from the drop-down color box.
5) Align table on your Web page by selecting an option from the Alignment drop-down box.
6) Click OK on the Table Properties dialog box.
-
To add text to a table:
1) Place the cursor into the cell you where you want the text.
2) Type your text.
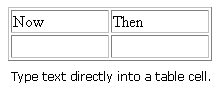
TIP: A "cell" is one block in a table.
To add images to a table:
1) Place the cursor inside the cell where you want the image.
2) Click the Insert Picture From File button on the Image toolbar. The Picture dialog box appears.
3) Find and click the name of the image file. The file name will appear in the URL text box.
4) Click OK on the Picture dialog box.
You can add additional columns or rows to a table - just in case you need to make a last-minute addition.
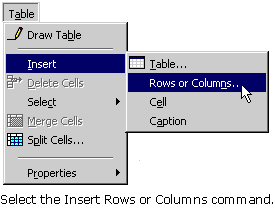
To insert additional columns or rows into a table:
1) Place the cursor in the table in a cell that is next to where you want to insert the column or row.
2) Click Table on the Menu bar and select Insert, then Row or Columns. The Insert Rows or Columns dialog box appears.
3) To add a row, click Rows, and then click Above selection or Below selection. To add a column, click Column, and then click Left of Selection or Right of Selection.
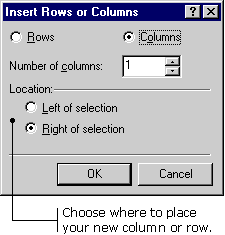
4) Click the Number of rows / columns spin controls to enter the number of rows or columns you want to add.
5) Click OK on the Insert Rows or Columns dialog box.