Tame Text


Help us out here, Power. Let's say you've got a text box about worms centered in your slide. Maybe you decide you want to move it to the left... Can you do that?


Hey, they don't call me Power for nothing. But if you want to make the following changes to text boxes, make sure you're in Slide View.


Moving a text box
If you don't like where a text box is positioned on a page, you can move it to a new location. First you select it, then you move it.

    1. Click the text box you want to move. A thick gray border will appear around the text box.

    2. Place the pointer on the border. The pointer will change into a four-headed arrow.

 Move Pointer

    3. Hold down the mouse button and drag the box to the new location.

    4. Release the mouse button.


Power, let's say I have a text box listing my great qualities. How can I increase the size of that text box to fit everything?


You'll also need to resize the text box that holds your ego, Jim.


Ho ho! The chemistry. No wonder you two get such high ratings.


Resizing a text box
The gray border that appears around an object when you select it has square handles on its corners and on its sides. These are called selection or resizing handles. You can click and drag these handles to resize text boxes.

    1. Click the text box to select it. A gray border will appear around the text box.

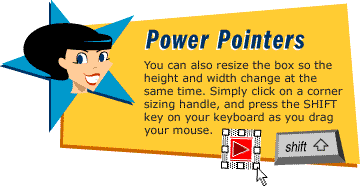
    2. Place the pointer on a resizing handle. The pointer will change into a two-headed arrow.

 Two headed arrow

    3. Hold down the mouse button and drag the resizing handle until the box is the size you want. Drag outwards to make the box larger. Drag inwards to make the box smaller.


Resizing a text box tip


Now let's say I have a text box about this guy I like. Then I meet another guy I like. How do I add a text box to talk about him?


Fickle, fickle. Here, let me show you how...


Adding a new text box
Sometimes, you may want to add text to a slide without using a built-in text box. For example, you may want to type a label for a drawing, or you may want to add text to a blank slide layout. In PowerPoint, you can add your own text boxes to any slide using the Text Box tool on the drawing toolbar.

    1. On the drawing toolbar, click the Text Box button. The pointer will change to a cross.

Text box button

    2. Click on the slide where you want to place the text. A small text box will appear.

    3. Type a word in the text box. As you type, the box will expand to fit the text.

Expanding text box
Expanding text box

    4. After you finish typing, click outside the text box. The border around the box will disappear.


How about copying text boxes? Do I have to type the whole thing over again?


Jim, come on, I'm a computer program. Why do you think we were invented?!! To prevent you humans from having to do repetitive tasks.


Oh, I like that...


Copying a text box

    1. Click the text box to select it.

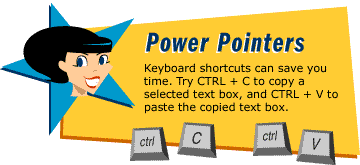
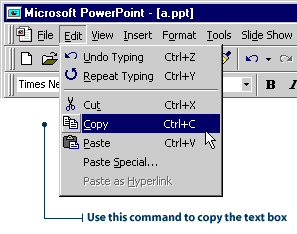
    2. Place the pointer on the box's border and click again. The insertion point will disappear from the text box.

    3. Click the Edit menu, then click Copy.

Copy command

    4. Click the Edit menu again, then click Paste. A copy of the text box is now pasted on top of the original box.

Two text boxes

    5. Click and drag the new text box to the location you want.


Keyboard Shortcuts tip


How about deleting? Can you delete a text box you don't need anymore?


Piece of cake.


I wish deleting dirty dishes were this easy!


Deleting a text box
You can delete your text boxes using the Delete key on your keyboard.

    1. Click the text box to select it. A gray border will appear around the text box.

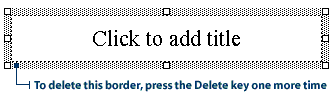
    2. Click the box's border. The insertion point will disappear from the text box.

    3. Press the Delete key on your keyboard. The text and the border both disappear. The entire text box is deleted.

If you want to delete a built-in text box (one that came with the original slide), you need one additional step.

    1. Click the text box to select it.

    2. Click the box's border and then click the Delete key. The text disappears, but the border remains.

    3. Click the border again and press the Delete key. The entire text box is deleted.

Deleting the text box border


Back
Quick Quiz
Next