PowerPoint in the Classroom

with Jim Jingle UNIT 7
Timing and Rehearsing

  • Neat Notes
  • Talk Time
  • Auto Act
  • Slide Show
  • Cool for School


PowerPoint in the Classroom is produced by ACT360 Media Ltd.
in conjunction with Microsoft Corporation.
Copyright 1998-2009. All rights reserved.

See our entire collection of online tutorials
by visiting www.ACTDEN.com


Neat Notes


You say you can help a speaker prepare notes. Tell me about that. I’m a notes kind of guy. Without a shopping list I’d forget what to buy at the market. And if it wasn’t for my handy teleprompter, I’d forget my opening monologue.


For starters, I provide a place to write notes on the slide as the presentation is being prepared. It is a lot like having your own teleprompter...


Creating speaker notes
When you give your presentation, you may need to refer to notes to elaborate on a slide's material, or to remind you to mention some detail. In PowerPoint, you can write your speaker's notes while you work on your slides. Simply go to Note Page View and write your notes for the slide in the text box provided. Once you've written these notes, they can only be seen in Note Page View. They will not be displayed during the Slide Show.

Follow these steps to create speaker's notes:

    1. In Slide View, display the slide you want to create notes for.

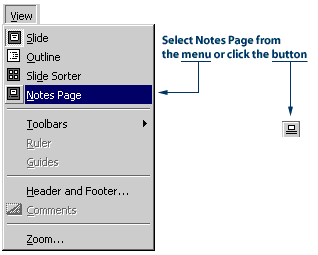
    2. Click the View menu, then click Notes Page. You can also click the Notes Page View button in the lower-left hand corner of the PowerPoint window. A page will appear containing the slide and a text box.

Selecting Notes Page

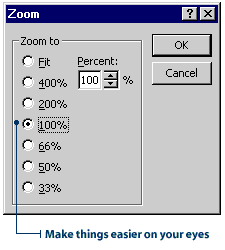
    3. Adjust the Zoom to 100% on the Standard toolbar. This will make your text easier to see.

Zoom Control

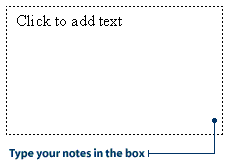
    4. Click in the text box and type your notes.

Text Box


What if you prefer working off printed notes? Can you print out your speaker notes?


You bet. Just hook me up to a printer and I'm ready to go.


Printing your speaker notes
The best way to use your speaker's notes is to print them out and have a copy handy while you give your presentation. When you print your notes, you have the option of printing both the slide and the notes, or just the notes.

The following steps show you how to print just the speaker's notes.

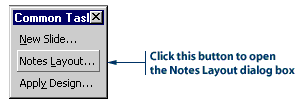
    1. On the Common Tasks toolbar, click the Notes Layout button. The Notes Layout dialog box will appear.

Notes Layout button

    2. Click the check box next to Slide image to remove the check mark. Then click OK to close the Notes Layout dialog box.

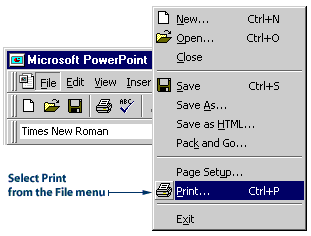
    3. Click the File menu, then click Print. The Print dialog box will appear.

Printing your notes

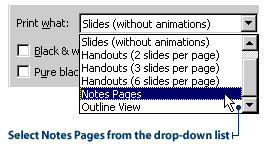
    4. In the 'Print what' drop-down list, click Notes Pages.

Making a printing choice

    5. Click OK to print the notes. You now have speaker's notes to refer to when you give your presentation.


Talk Time


PowerPoint, I work in TV comedy. As you know, when it comes to comedy, timing is everything.


Presentations are no different. That's why I have a "Rehearse Timing" feature. So, if your assignment is a 30-minute presentation on dinosaurs, you'll know if your presentation is too long or too short. You want time to get across the information you need, but you don't want your audience falling asleep or fidgeting in their seats.


Timing your presentation
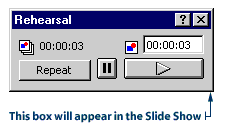
When you select Rehearse Timings, your Slide Show starts running, and PowerPoint starts timing it. The timing is displayed in the Rehearsal dialog box. When the Slide Show comes to an end, PowerPoint will give you the final running time.

Follow these steps to time your presentation:

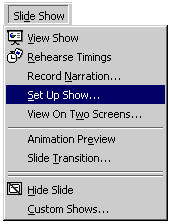
    1. Click the Slide Show menu, and then click Rehearse Timings. The Slide Show begins and a Rehearsal dialog box appears in the lower-right-hand corner of the screen.

Rehearsal dialog box

    2. Begin speaking and presenting your show.

    3. If you want to repeat your rehearsal of a slide, click the Repeat button on the Rehearsal dialog box. The current slide repeats and the timing for it starts over.

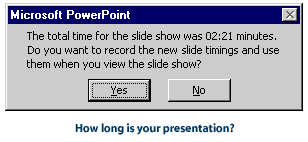
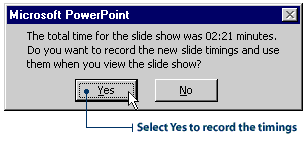
    4. Rehearse your presentation until it's finished. After you're done, a message box appears. It tells you the final running time and it asks you if you want to record the timings to use for viewing the presentation.

Presentation time dialog box

    5. Click No. You are returned to the PowerPoint window.

Note: You click No because you are only timing the show. You would click Yes if you wanted to use the recorded timings to automate your presentation.


Auto Act


If I'm giving a presentation, I may not want to have to stop to click a mouse to advance the slides. In my own case, I need my hands free to sign autographs. Is there a way to automate the presentation? My bet is that you can do this. I mean, your middle name is "Automatic", right? Or was it Bartholomew?


Automating your presentation
An automated presentation is one where you don't have to use the mouse or the keyboard to advance the slides. In other words, the slides advance by themselves.

To automate your presentation, you must set timings for each slide. A good way to set the timings is to use the Rehearse Timings feature.

Follow these steps to add timings to your slides and automate your presentation:

    1. Click the Slide Show menu, then click Rehearse Timings.

    2. Rehearse your Slide Show as you did in the previous section. When your presentation is done, a message box appears, asking you if you want to record the timings.

    3. Click Yes. PowerPoint will record the time you spend on each slide and apply this to your presentation. Your Slide Show will now run automatically.

Presentation time dialog box

Note: Remember, you can also set timings for your slides using the Slide Transition dialog box. A disadvantage of this method, though, is that you're only guessing at how long each slide should run.


If you can add your own narration and time the slides, does the human have to be there at all to do the presentation?


Nope. You can just put a computer running me in a room and I can do the presentation myself. This is very handy at conventions or at school science fairs -- where the presenter can't be there all the time.


Wow! I could just have you present this show for Sue and me! That way we could vacation in Tahiti...


Shh. Don't tell our producer that. We might be out of a job!


Creating a self-run kiosk presentation
If you're not going to be available to run your Slide Show, create a self-running kiosk presentation. This sort of presentation is often used at trade shows or conventions. Once the show is started, it runs in a continuous loop until someone presses the ESC key on the keyboard.

When designing a self-running presentation, you can set up the Slide Show to run with automatic timings, or you can set it up so the viewer can move through the show with mouse clicks.

The following steps show you how to create a self-running kiosk presentation with automatic timings.

    1. Automate your presentation using the three steps shown above.

    2. Click the Slide Show menu, then click Set Up Show. The Set Up Show dialog box will appear.

Selecting Set up Show option

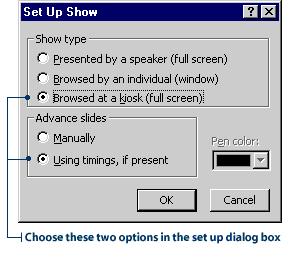
    3. Under Show type, click Browsed at a kiosk (full screen).

    4. Under Advance slides, click Using timings, if present.

Checking your options

    5. Click OK.

Your presentation is now self-running. Once it is started, it will loop over and over until someone hits the ESC key.


Side Show


But what if my presentation has lots of text information? People read at different speeds. How can an automatic slide show handle that?


Or what if I'm doing an automatic presentation of my jokes? I need to give space for people to laugh. But I never know how long people will laugh. Audiences are fickle.


Simple! I offer a feature that allows the viewer to advance the slides at their own pace.

Wow! How empowering! Power to the people!


Letting the viewer run the show
Follow these steps to set up a viewer-run show.

    1. Click the Slide Show menu, the click Set Up Show.

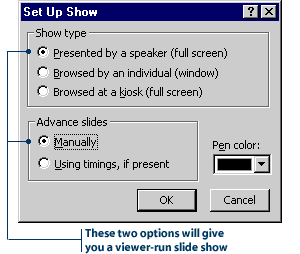
    2. Under Show type, click the option Presented by a speaker (full screen).

    3. Under Advance slides, click the option Manually.

Checking your options

Now, the viewer can advance through the slide show using the mouse or the keyboard.


I like this adding buttons thing. But how do you do it? I'm not a computer programmer. Although with the salaries they make, it's certainly a good career move.


With me helping you out, you don't need to be a techno-geek! Adding buttons is as easy as a few clicks.


Adding your own buttons
When you set up a viewer-run show, the viewer must move through the slides by clicking the mouse or using the keyboard. However, not all viewers will know how to advance slides this way.

Make your presentation easier to view by adding action buttons. When you add an action button to a slide, you give the viewer an obvious place to click the mouse.

The following steps show you how to add a Forward action button to your slides. When viewers click the Forward button they will advance to the next slide.

    1. In Slide Show View, display the slide you want to add the action button to.

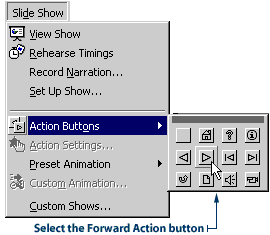
    2. Click the Slide Show menu, point to Action Buttons, then click the Forward Action button. The pointer changes into a cross.

Choosing an action button

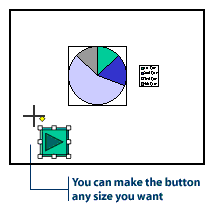
    3. Click on the slide and drag, until the action button is the size you want. The Action settings dialog box will appear.

Action button on the slide

    4. Notice the option next to Hyperlink to Next Slide is already selected. Click OK to close the Action Settings dialog box.

Resizing Buttons tip


Note: The Forward action button advances slides, but it does not start animations. If you have animations in a viewer-run show, set a timing for the animation with these steps: Open the Custom Animation dialog box. Click the Timings tab, then select the option to Animate Automatically.

Experiment on your own with adding other action buttons to your slides. For instance, try adding the Beginning action button to the last slide of your presentation. When viewers click this button, they will return to the first slide in the show.


Cool For School

PowerPoint: Not Just for Presentations

The following interview has been published with permission of My Favorite Teacher Magazine (MFT). MFT spoke to Mr. Ed U. Kayshun to find out how he manages to pull off such fascinating parents' nights each year. He's been getting rave reviews - and MFT brings you the scoop on how it's done.

MFT: Well Mr. Kayshun, we've been hearing a lot about your parents' nights. I understand they're always a big hit -parents are actually looking forward to them for weeks in advance. What's your secret?

Ed: The secret is in the presentation. I've always worked hard to find new ways to present info - because we really are novelty seeking animals, after all. Now that I have PowerPoint to help me out, it's even easier.

MFT: How does PowerPoint help?

Ed: It is really quite invaluable to me, to be honest. By using PowerPoint, you can run presentations automatically, giving you time to cruise around and shmooze with the guests. You just run the presentations on a loop - and leave them there for parents to check out at their own leisure.

MFT: Wow. That sounds like a real time-saver! What kinds of presentations do you run?

Ed: The possibilities are endless, really. It's up to you. For example, you can present an animated view of photosynthesis, poetry recordings, school renovation plans, or stats from all the different sports teams.

MFT: So, whose presentations do you use?

Ed: You can feature work by teachers and students. Once again, it's your choice. That's the great thing about PowerPoint - it's so versatile. And unlike human speakers, it never goes hoarse.

MFT: Well Ed. It sounds like you've really got something going on with this parents' night thing. I'm planning to make it down for the next one - so I hope to see you there. Any last words on how to make a successful night of it?

Ed: Just use PowerPoint on loop - and maybe give out some free pie.

MFT spoke to math teacher Dave I. Ding to see how he uses PowerPoint presentations to teach math drills to his students. It's a pretty short interview because it's just so simple to use.

MFT: So, Mr. Ding. I hear you've been using PowerPoint to create drill cards. Tell me more…

Dave: Well, there's not much to tell, really. You just set PowerPoint onto automated presentation and it runs itself. Then you have some extra time for marking and lesson planning while students watch your presentation.

MFT: Oh. So, what kind of presentations do you do?

Dave: I like to use it for the good old multiplication tables, mostly. Sometimes I like to record myself reading them, because I have to admit to a great fondness for my own voice. I know some language arts teachers who like to use the automated presentation for teaching students to pronounce the vowels and other phonetics. It's really great.

MFT: I see... Well, uh, is there anything else you have to say about it?

Dave: Uhhhh… Not really… Nothing I can think of because well uh… ya - it's just so simple that I think I've explained it already.

MFT has made contact with social studies teacher Ms. Tess Ting to find out more about how she sets up quiz stations that allow her students to work on their own. Her students seem to love it.

MFT: Students aren't usually too excited at the thought of doing tests and quizzes. But you seem to have inspired some kind of enthusiasm in your classroom. How is this possible?

Tess: I've managed to do it with PowerPoint - by creating multiple-choice quiz questions that basically work with any topic.

MFT: How do you do it?

Tess: I write a test that contains four answer choices for each question. Then I place four action buttons next to each answer choice - with one right answer, of course, and three wrong ones. If students choose the wrong answer, they are sent to a "try again" page that directs them back to the question. If they choose the right answer, they advance to the next question.

MFT: That sounds like it would be a fun quiz to do - but it also sounds like a lot of hard work for you.

Tess: It is hard work - and it's definitely not something you can do overnight. But everyone knows hard-workers are drawn to the teaching profession. Another thing - while you can't use it to track the student's final score on the test, the student still benefits from working to find the right answer.

MFT: Do you think it's really worth it for you to put in so much effort?

Tess: Oh definitely! If you choose the right topics, you can use the same quiz stations year after year. You can also trade your quizzes with teachers in other classes.

MFT: That does sound worthwhile. Thanks for sharing this info today.